What do you get when you mix five months with some elbow grease, snafus, design pivots, and a lot of interruptions from a very cute toddler? Well, my cherry rental kitchen redo, that’s what! That’s right, I’m back with an update…the final update because SURPRISE! The space is actually done and I LOVE IT. It truly makes me so happy. Stay tuned in the next few weeks for the reveal but for today, I have a lot of in-between progress to share to catch you up.
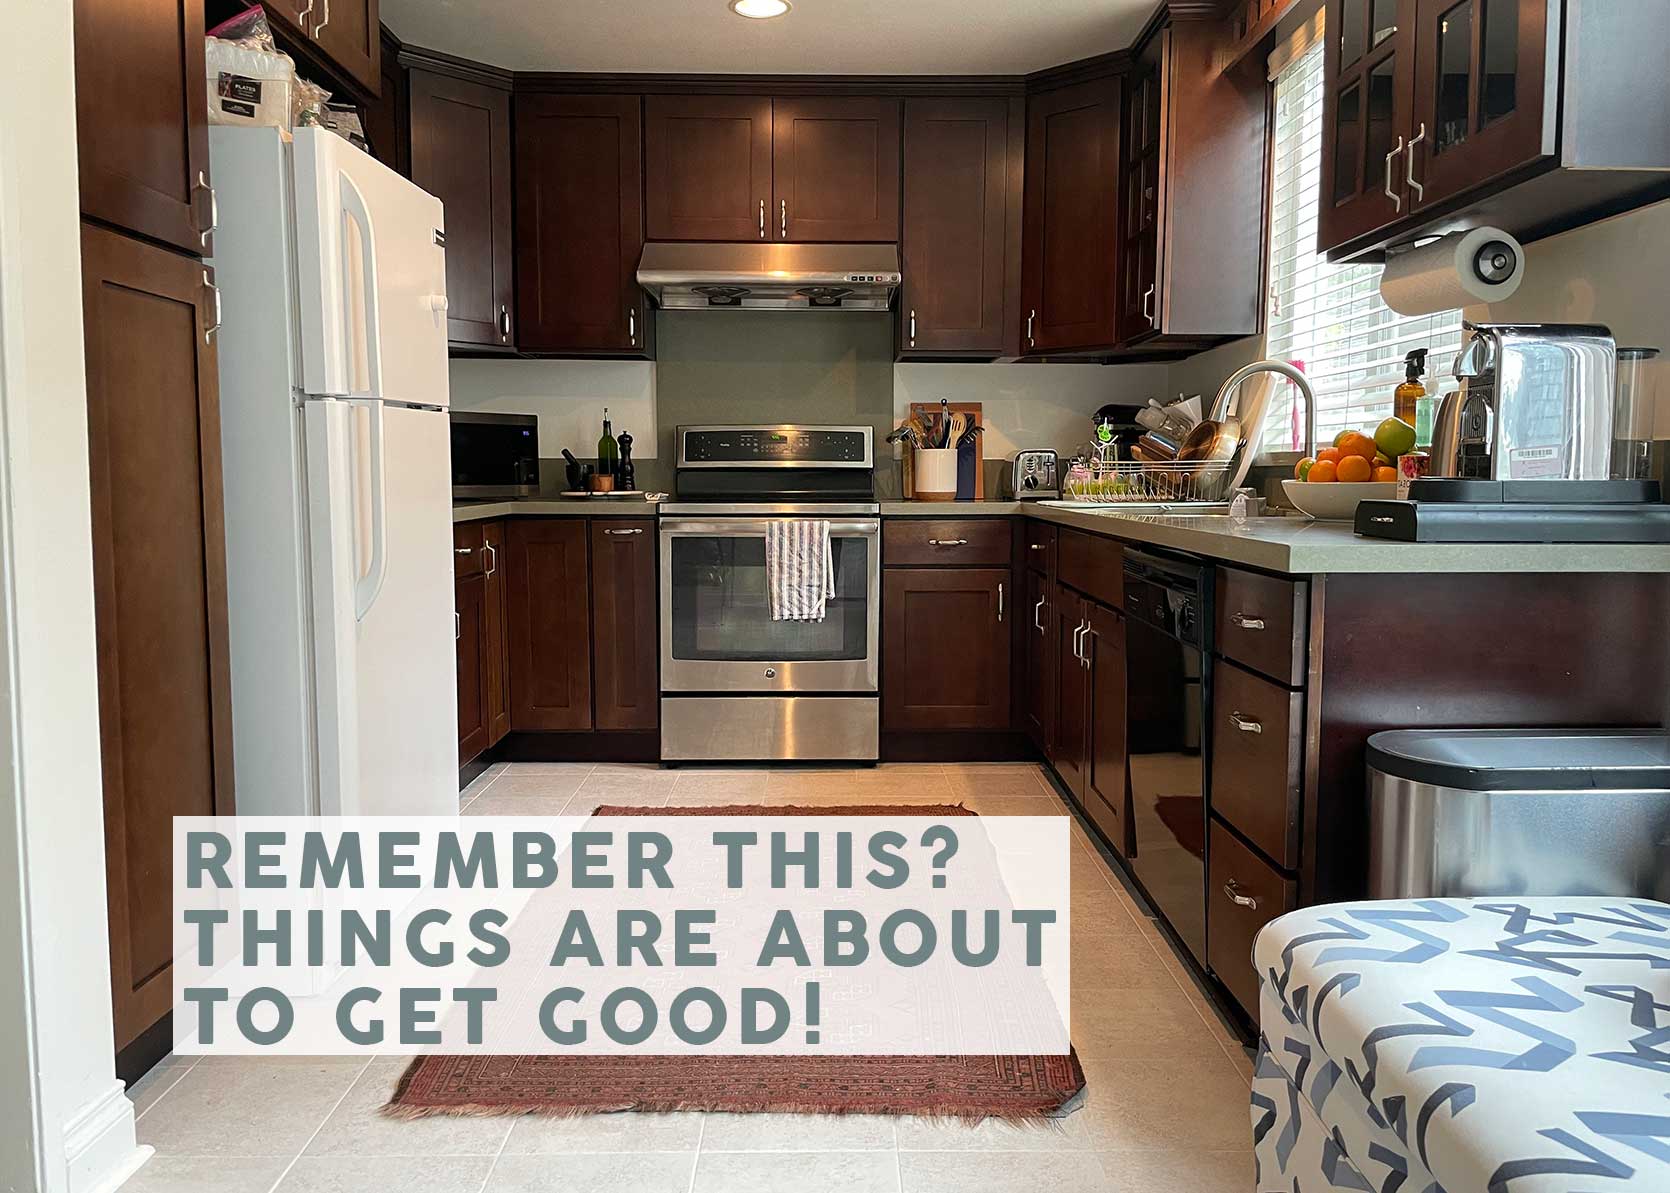
First, let’s remind you where we started, which I shared back in June on this post.
The Original Cherry Cabinets In My Rental


My biggest hurdles to jump in bringing this place to life a bit were as follows:
- Somehow lighten the heaviness of the cabinets without actually changing the cabinets (again, this is a rental so I have a lot of limitations and everything has to be reversible).
- Update some of the early 2000s vibes of the hardware, lighting, laundry closet doors, etc.
- Create a breakfast nook so we could eat in here.
- Add more storage so I could clear off the counters some more.
- Bring some cohesion to the mismatched appliances.
In general, it was a totally fine space, especially considering I’ve had way worse as a renter. But it was just bland. As personable as a sack of bread flour. And if you know anything about my design style, “bread flour” is a far cry from what sets my heart ablaze. I like pattern, color, and charm. Someone once asked me to describe my aesthetic (wait…it might have been for my bio on this website), and I think I said something like an English grandmother’s cottage after her hip grandkid came in and pared it back just a little.
In my original post about how I was going to modernize my cherry Shakers, a lot of you thought it just couldn’t be done, but then the moodboard I presented changed a lot of your minds. My product choices evolved since this summer (keep reading) but the *vibes* are still pretty dead-on.
Evolution of a Moodboard
Here’s the very first design plan I shared and frankly, I still love it. It’s impactful, colorful, lived in.

Brass Cup Handle | Brass Bar Cabinet Pull | Green Tile Backsplash | Paint | Curtains | Pinstripe Fabric | Checkerboard Flooring | Brass Rail | Brass Hooks | Wicker Hanging Baskets | Rug | Dining Chair | Dining Table | Burgundy Cabinet
After ordering six different peel-and-stick backsplash options (more on that in a few scrolls), including the one shown above, I decided on a different product and also found a bistro table that was just the right size for my eat-in area. Additionally, I sourced two secondhand wooden dining chairs very similar to the ones shown below on Facebook Marketplace for about $60. Here’s that board updated with these picks:

Bistro Table | Peel & Stick Backsplash | Dining Chair
As a reminder, my plan for the curtains was to take out the laundry doors and replace them with panels. I’d color-match my final selects for a paint color for the walls so that it all felt seamless and visually cohesive. I loved the idea of bringing a dash of burgundy on the other side of the space via the cabinet to balance the red of the kitchen cupboards. And well, who doesn’t love a checkerboard floor right now?
But then a few things happened…
Picking Final Material Selections
I know I already revealed the backsplash I went with, but let’s take a look at some of the other samples I considered.


The left is a skinny tile that closely matches the sage green of the countertops (it doesn’t look like it in the photo as much as it does in real life). I liked the color variation and how they felt modern but timeless. The four on the right are all by a company called Smart Tiles. It’s hard to see in my photo but the top two do look like zellige tile just…very glossy. They were beautiful, and the material was kind of gel-like and felt durable. Neither color worked for me (too dark, too blue in undertone), and neither did the penny tile or the other subway. They were very minty and also read “2004 glass tile” which I did NOT want.


Remember my “cohesive paint and curtain” plan? Yeah…no. The second I laid eyes on Jenni Yolo’s Chasing Paper collection that launched earlier this fall, I knew I had to have it. (P.S. You might notice there’s a green cabinet in the photo with the wallpaper samples…the red one I wanted went out of stock and stayed out of stock, so I settled on the emerald version instead, and honestly, it’s the best happy “inconvenience” that happened because it’s perfect in here.) While I was deadset on the yellow and green colorway, the wonderful team at Chasing Paper sent me samples of the entire line in all the shades available and I pivoted once again. The mustard felt too heavy in my small space but the lighter tones of the bottom paper were beautiful and soft and happy.

This Ruggable rug was one of the first things I picked out for the whole space. I LOVE the Blackthorn pattern from Morris & Co. in theory, but when the rug arrived, I couldn’t shake the feeling that it wasn’t right in here. It had a little too much vintage-esque fading, and the dark green I thought comprised the rug when I saw the photo of it online turned out to be more of a dark blueish black.
I lived with it for months and one day just decided I didn’t want to settle. They graciously let me donate it instead of having to mail this large, heavy thing back and I went on the hunt for a secondhand rug on Facebook Marketplace (spoiler: I found an amazing wool Armenian rug for $80 and grabbed it IMMEDIATELY and it’s gorgeous and makes me very happy).
My Biggest Spend: New-to-Me Appliances
My absolute biggest challenge in here was figuring out these appliances. Before we moved in, we swapped the white electric coil stove for a great GE Profile glass-top stove I found on (you guessed it) Facebook Marketplace for $350. That’s what you see in the original images I shared, but here’s what it looked like when we first got the townhouse:

The fridge was white, the stove was white, and the dishwasher was black. So when we brought in the new stainless range, we had three colors going on in here. It was wild and no amount of backsplash or pretty wallpaper was going to solve that problem. I considered adding some stainless wrap or contact paper to both but the truth was, the dishwasher was ancient and barely washed the dishes we put into it (not to mention how inefficient it must be from an energy standpoint), and the fridge was too small for our needs being that I cook most meals here. Plus, the freezer door was always popping open randomly and we’d come back hours later to an open freezer and everything soft and squishy.
Charles and I checked with our landlord about replacing them, which she was okay with as long as we footed the bill (and put back what was here when we eventually move out). We didn’t want to spend $5,000+ on a new fridge and dishwasher, so I hunted for weeks, nay…MONTHS for the right product at the right price on Facebook Marketplace.
Guys, this was my EVEREST. I found a nearly new LG smart dishwasher for $125, and a GE profile French door fridge (in a hyper-specific size that had to be both counter depth AND no wider than 33? because the opening didn’t fit a full-size fridge) for $400.
All in, we spent about $1,000 on the range, fridge, and dishwasher after delivery, and to us, it was money well spent. We can bring these appliances with us to our next home or possibly even leave them if our landlord is willing to pay us for them.
Plus, the obvious win of looking considerably better than our mismatched monstrosity from before.


A Last-Minute Lamp Snaffu And A DIY Pivot
So, we’re finally near the end, and before I show you my finally FINAL moodboard, I wanted to also tell you of another shift I had to make at the absolute last minute. I found this beautiful woven pendant for the breakfast nook from Lulu & Georgia on Facebook Marketplace (my BFF) for $125. It was originally about $400, so it was a TOTAL score. Except that a week before my scheduled photoshoot, it arrived broken. The seller claimed it happened in the mail, I think he sold it to me broken because there was nothing in the very sturdy box that could have caused this damage.
Long story less long, he offered me $50 to keep the (broken) lamp, or a full refund if I sent a video of me further destroying it and throwing it in the trash. My heart couldn’t handle that, so so far, I’ve kept it. I don’t know what to do with it (any ideas?!?!?) but trashing it feels immensely wasteful.


All of that, of course, meant that I needed to find a solution for my shoot with only days to spare. I looked on all the secondhand sites to find something, but everything was either out of my budget (considering I was already out $125), or just not what I wanted stylistically. So I contemplated somehow making something myself and went on the hunt for inspiration. I’m very into the pleated lampshade trend so after some research, I landed on just buying a cheap Empire lampshade and trying my hand at adding some fabric to it. I found pretty patterned sheets on clearance at Target (much cheaper than fabric most times!!), watched a handful of YouTube tutorials, and the finished product is one of my product DIY moments. I can’t wait to show you it! The day before the shoot, I bought a mini pendant kit, strung it through the top part of the lampshade, and wired and hung it myself.
The Final Moodboard
I’ve come a long way with a lot of near misses, and bobs and weaves, but this is where I finally landed:

Brass Cup Handle | Brass Bar Handle | Pendant Light | Striped Fabric | Paint | Peel & Stick Backsplash | Peel & Stick Wallpaper | Yellow Chair Fabric | Table | Dining Chairs | Display Cabinet | Rug (vintage)
Well…except for with a different pendant. I picked a green paint that coordinated with the wallpaper to paint the laundry doors instead of taking them out (they provide good sound buffering which curtains wouldn’t do), and as mentioned, changed the display cabinet to emerald. That’s a (very bad) photo of the rug I bought so forgive me but you get the gist. I’m realizing now I didn’t even begin to discuss what I was doing with the striped fabric but I’ll get into that in the reveal post instead (hint: a very cheap DIY for anyone who loves a Roman shade). And because I loved the mustard of my original wallpaper pick, I brought it into the fabric I used to reupholster the seats on my used chairs (thanks Max Humphrey for sending me some of your Pindler & Pindler fabric, it’s perfect).
And that’s it. This is where I leave you. Again, I’m so, SO excited to show you the finished product because the change is so good without being wildly over-the-top in terms of effort. Yes, it took me 5 months but that’s just because life and money got in the way. The Internet loves things to be instant, but real life takes time. And I’m glad I put in the time to get it all sorted in a way that excites me every day when I walk through that kitchen door.
Stay tuned.
Your friend in “make it work” design, Arlyn